
In preparation for my 30th birthday, I scoured the interwebs for steampunk accessories that met a couple of basic criteria:
a) They matched my outfit
b) They didn’t require me to mortgage my soul to pay for them
I managed to get most of the things I needed, but one cosplay accessory alluded my grasp; a pair of steampunked Nerf guns. They are easy enough to find, but not commercially available. Nerf don’t make them with steampunk detailing to sell alongside their standard designs. Any punked guns have to be modified by hand which requires an actual human to do a the labour, rather than a factory robot. As a result, those guns available to purchase online, from Etsy and the like, are rather expensive. Eventually I resigned myself to not acquiring said guns for my party outfit.
Until I discovered a pair of Nerf Strongarm’s given to my 3 year old last Christmas!
He loved those things, but he’s still far too small to operate them on his own. He isn’t strong enough to reload the barrel after each shot and I’m not sure his little fingers are even able to pull the trigger properly. As such, they lay abandoned in the bottom of a toy box.
I felt a momentary flicker of guilt as I stole my son’s toys from his room and claimed them for my own. I told myself they were going to a better, more worthy cause. They would be used now, instead of cluttering up the toy room and gathering dust and scratches. I told myself he would get over it, and then I didn’t care anymore. They were mine and they were cool and I was on the brink of obtaining my long desired cosplay accessory!
Plans began to multiply in my head – what materials did I need to create a look that matched my corset? What embellishments, paints and tools? Then the trawling of the interwebs commenced. I needed to find a tutorial, or at least some basic instructions on how to turn these fluorescent plastic guns into something that was at least passable as an artefact from an alternate past or future where steam rules supreme.
So, in honour of the bloggers who passed their knowledge to me, I shall now pass my knowledge to the next generation of punkers. My method is below, discovered through trial and error and which finally gave me a pair of Nerf’s I adore.
Happy Punking!!
Materials:
Nerf Gun/s (available at toy shops or online)

As mentioned, I used a pair of Strongarms, but there are a wide variety to choose from
Acrylic paints


I used Semco Acrylic Paints in 120ml tubes (purchased at Spotlight) in Black, Metallic Silver, Raw Sienna and Metallic Gold
Varnish

Brushes

Have a wide variety of sizes, especially fine tips for details. Make sure they are suitable for use with acrylic paint.
Paint palettes and a mixing spatular
Water and a jar – to clean your brushes
Newspaper or a plastic table cloth – to protect your work surface
Optional:
- Metal Steampunk embellishments (available in craft stores or online) – some guns will have flat surfaces that you can decorate with cogs or keys. You will need some super glue if you choose to add embellishments to your gun.
The most important thing to remember when punking your gun, is to take your time. Let the paint dry and don’t rush.
Method:
- Clean the gun with a soft cloth and soapy water, or a baby wipe. Make sure all dirt and dust has been removed from the surface.
- Apply a BLACK base coat to the entire gun – allow to dry

3. Apply a second coat of black paint if the coverage is thin enough to see the original colours through – allow to dry

4. If you want the gun to function once it is painted, fire a few rounds after each coat to ensure the mechanisms aren’t stuck together with paint.
5. Apply the most prominent colour next – for my gun it was SILVER. The black paint will give the silver a surface to adhere to. For an aged or stressed look, only apply the paint in small amounts, using a ‘dry brush‘ technique. Build up the layers of the silver paint until you are happy with the look.

** Fire a few rounds to ensure the mechanisms aren’t stuck together with paint**
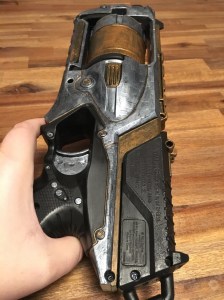
6. Apply the second most prominent colour – for me it was the BRONZE/GOLD. I created this colour by mixing the RAW SIENNA with the METALLIC GOLD. Again, use a ‘dry brush’ technique to build up layers of colour to create an aged look.
7. Work your way around the gun until all the areas you wish to paint are complete.
8. Use a fine brush to paint the screw heads or details on the gun. Allow the paint to dry fully.

** Fire a few rounds to ensure the mechanisms aren’t stuck together with paint.**
9. Touch up any areas that have smudged or been scratched. Allow it to dry fully again.
10. Using the MATTE VARNISH, apply a single coat to the entire gun. Allow to dry for at least an hour, or overnight. The varnish will protect your paint and prevent it being scratched back to the original surface colour.
11. If desired, apply a second coat of varnish and allow to dry.
If you are adding metal embellishments, you can now use super glue to secure them to the surface of your gun.


Leave a comment